There have been a small number of you... nagging me about some patterns =D. However, 1) I'm so busy making things I hardly have time to write down the pattern, 2) I'm horrible at writing patterns. Therefore, I will try to post pieces of patterns that might help guide you to making your own creations. You're probably thinking, "Shoot! I can find these anywhere!" And you'd be right, but still, one more post on the internet won't hurt. tee hee You can already get an idea of the standard I use for head and body from my Mr. Frog pattern. So today's PatternPost is for standard arm/leg for something like Amineko. Enjoy!
Arms:
This can be done in two different colored yarns to give the look of paws or not. Choose your hook size to correspond to your yarn. This will greatly effect the finished product size.
Frame/row 1: ch 2. in second ch from hook 6sc
Row 2: 2sc every sc (12)
Row 3-6: work even
At this pt can change yarns or anywhere further up the “arm” to give “socked” look. Or just one stripe… or whatever! Anything! Woohooo
Row 7: 1sc, sc2tog in next sc* repeat until 8 (stop and stuff the paw!! Keep stuffing up along the arm just a tad as you go)
Row 8-28 (approximately): work even
I work the arms as long as needed. I measure them up to the body letting the “wrist” fall about where the bottom of the body is.
Fasten off. Leave tail long enough for attaching to body.
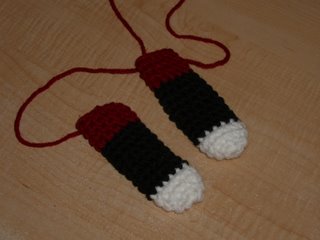
 Here is a sample of some arms I'm making for another Roadkill Kitty bag. It's a straight version of the amineko pattern - there is no decrease at the paw line. Also there is another change of color near the "shoulder" because Roadkill has a red t-shirt on. hehe You'll also notice how short these look. I've made them to suit Roadkill's body so they are only about 14 rows.
I'm really a horrible pattern writter. I dont know why. I think it's because I get confused with knitting (although I'm a horrible knitter haha). I hope you can understand what I've written or at least glean something from it. The legs are done in similar fashion to the arms. They begin just like the arms with 6sc then 12sc, however at this pt you add another row to 18sc (ch1, 2sc in next ch* repeat to 18) before you work even the 4 rows. And then you go back ( ch1, sc2tog* rep to 12; ch 3, sc2tog* twice will make 10) to 10sc to make the leg. Confusing? Sorry. This pattern can be adjusted to suit any size/type amigurumi. Experiment with yarn and hook size too.
Maybe I'll have an actual full pattern for something soon. Have fun! Oh, and don't forget to share your creations! I'd love to see them. Leave me a comment with a link or join up with Amigurumi-Along! (^_^)v

1 comment:
Hey Amigurumi Girl! How's it going? Thanks for posting the pattern, or recipe as I usually refer to them. I think it's pretty understandable. And I ususally have a really hard time translating written words to my hands.
Um, I just wanted to let you know that the stitch 'n' bitch is going to be happening this Thursday, the 6th. We start somewhere between 6 & 7. It's only 3 of us so far. At this point I'm the only crocheter. And definetly the only amigurumi maker. So just letting you know that it is actually happeing. Oh and we're going to have a yarn swap. Any and all yarn that you don't want anymore, you may be able to get rid of, and aquire more. That's always nice! Anyways, if you want I have a blog, it's amigurumiobsessions.blogspot.com if you want to leave a note there. Otherwise I can just check back later this week to give you directions if you want. Oh and please, bring a friend! The more the merrier!
Post a Comment